
Holiday Makeup Tutorial | ABH Sultry Palette
Affiliate links used - thanks for supporting HTC! <3

Last week, when I asked from some holiday content ideas on Instagram to help me get back into the swing of things in terms of writing on HTC, I got an overwhelming amount of request for holiday makeup looks and tutorials. My heart was all a-flutter because nothing lights me up quite like a pretty makeup look and sharing it with you all!
I sat down to create this look with no real idea of what I wanted to do, minus the fact that I wanted a bold red lip and I wanted to dig into the new Anastasia Beverly Hills Sultry palette. Since I was planning on going bold with the lip, I wanted to do something a bit more neutral and toned down for the eyeshadow. There are no rules in makeup, but I find that my makeup looks more balanced when I either do a super dramatic smokey/colorful eye and a nude lip or a more neutral eye look with a bold lip. One or the other, ya know?
So, all’s this to say, if you want to rock a bold red lip on Christmas day, I recommend that you pair it with bronzey and neutral eyeshadow colors - it balances it out while still looking festive and dramatic.
A few other tips to note about holiday makeup:
- This look included a few “extra” steps to help set my makeup and ensure it stays all day. This included using a translucent powder on a damp beauty sponge to press and set my concealer and foundation all around my smile and forehead lines. This helps prevent my foundation from creasing and settling into my smile lines throughout the day (or night.)
- I also lined my lips before putting on my (FAVORITE) long-lasting lipstick. I normally don’t do this step, but I find that this helps keep the lines of my lipstick crisp through the night and gives the color a little extra protection if it does start to fade.
- I’m all about that falsie life, especially for holiday makeup looks, but this look will look just as good with a couple coats of mascara if you aren’t about it. I recommend using this mascara or this mascara for that type of look.
Okay, let’s jump into the tutorial!
Holiday Makeup Tutorial featuring the ABH Sultry Palette

With any makeup look, I started off by priming my face and my eyelids. I pulled out the big guns for my face primer because I wanted a smooth canvas and something that would really help my foundation stay all day and night long. That means Tatcha’s Silk Canvas primer - a spendy little thing that is worth it for occasions like this. I used this all in my t-zone and cheeks to help fill my pores and fine lines. After, I primed my lids with Tarte’s Shape Tape concealer because I wanted to cover my veins and give my eyelids an even base. I set my lids with a translucent powder to prevent the concealer from creasing and to help my eyeshadows blend out on top of them.
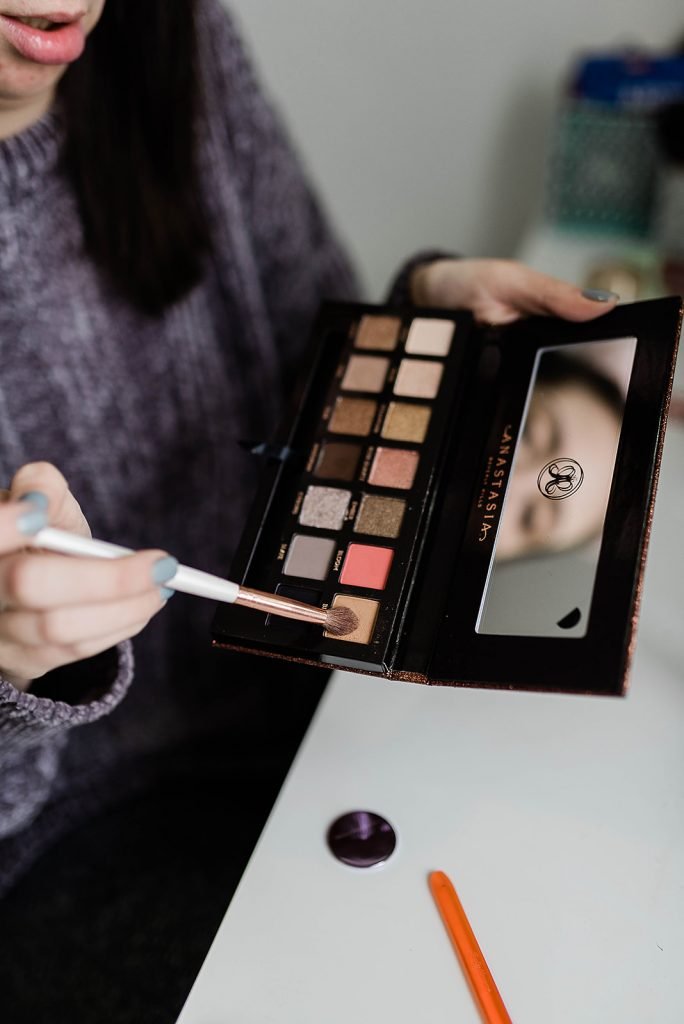

I started with the eyes first because I didn’t want any potential fall out to ruin my foundation. I took a big fluffy brush, opened up my Anastasia Beverly Hills Sultry Palette and dipped it into the shade Birch and blended this all over my lid and up into my crease. I wanted to make sure I had a good foundation of color all over my lid before building up the metallic shades on my lid. I used windshield wiper motions and small circular motions to make sure there are no harsh lines.

Not to get TOO fancy, but I took some concealer and patted it on my lid and slightly carved it out. I didn’t want a cut-crease so this wasn’t super precise, but I did want a clean and tacky base to put my brightest shimmers on. Feel free to skip this step if you want!

Next, I took a small, flat shader brush and dipped it into the beautiful bronze metallic color called Teak. I patted this on the outer two-thirds of my lid, making push it up into my crease and to leave the front 1/3 of my lid blank. I took the same fluffy brush I used to place the first color on my eye and gently blended out the edges to make sure there weren’t any harsh lines.
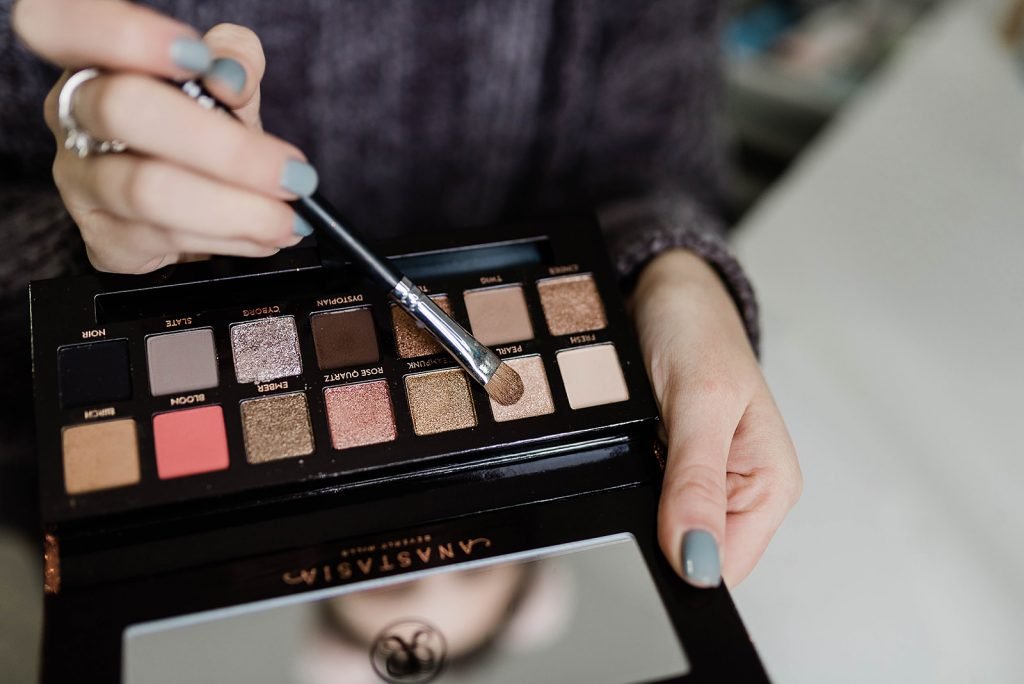

Next, I dipped into the shade Pearl, which is a beautiful champagne metallic and I patted this on the inner 3rd of the eye that I initially left blank. This will help open up the eyes and really brighten them!


To finish up the look, I used the dark brown color called Dystopian on a tiny detail brush and packed a tiny bit on the outer v of my eye and dragged it up into the outer crease, just to add a little more definition and smokiness.
Time to move on to the face!
First things first - foundation. I have fallen head over heels in love with the Laura Mercier Flawless Fusion foundation and haven’t stopped using it since I got my hands on it a few weeks ago. It has amazing coverage and the most beautiful satin finish that really lets the skin breathe while making it look flawless. It applies well with both a damp beauty sponge and with a brush - I opted to use a brush to get optimum coverage for this look!


I applied the Tarte Shape tape concealer under my eyes and over any trouble spots and blended it out with a beauty blender.
Next - Cream Contour! Another product I’ve been really loving is the Fenty Beauty Match Stick in the shade Amber. It applies smoothly and has the perfect undertone for a contour. (But, I will say I am not a fan of the highlight and blush that came with it in the trio I bought. They don’t blend out at well and move the foundation around when applied.) I blend the cream contour out with a small stipple brush and then set my entire face with the ItCosmetics ByeBye Pores powder, pressed with a damped beauty blender where all my smile lines and forehead lines are (like mentioned above.)


To finish up the eyes, I used the Stila Stay All Day liquid liner to line my eyes and to add a tiny little-winged liner. After, I dipped a small detail brush back into Steampunk and blended it out along my lower lash line to smoke it out just a tiny bit. I then popped a tiny bit of the Ofra Cosmetics highlight called Glazed Donut on the inner corner of my eye.


Back to the face - I first applied my highlight (Ofra’s Glazed Donut) on top of my cheek bones. I know that this may seem a little backward but I wanted more of a “lit from within” glow instead of a “beam me to the moon” glow. By applying the highlighter first, before the rest of my powders, it allowed me to diffuse the light a bit. After the highlight, I applied the Too Faced Sweet Tea bronzer and then, to finish it off, the Laura Geller baked blush in the shade Tropic Hues. Both of these products have a great glow to them, so it adds to the overall glowiness I was going for!


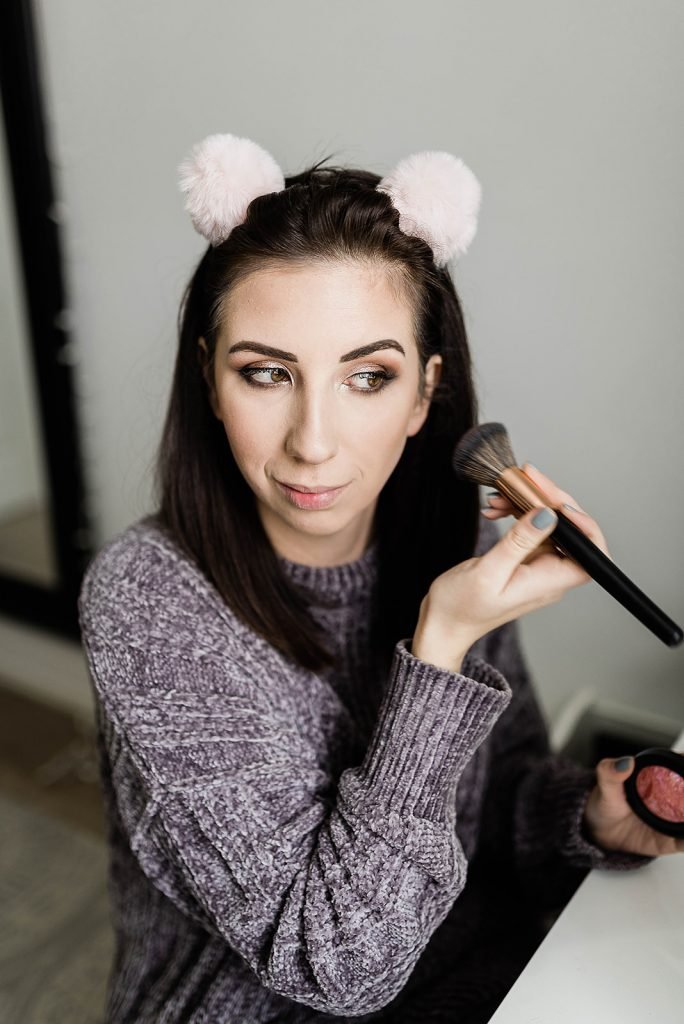
To finish up the eye look, I popped on a pair of false eyelashes for a little extra drama. Like I said above, you can always apply some mascara if you aren’t the falsie type.
The face is all done! I spritzed it with some setting spray before moving on to my bold holiday red lip! I first lined my lips with the Buxom Plump Lip Liner in the shade Code Red. Like I said above, this is an extra step I take when I want to make sure that my lip color lasts all day long. If my lipstick starts to fade, the liner will help it fade gracefully and without any weird patches.
For lipstick, I went with my TRIED and TRUE Maybelline Super Ink lipstick in the shade Heroine. This is the most vibrant red and this lipstick is BULLET.PROOF. I have sung it’s praises for over a year - it doesn’t smudge, smear, or fade for hours and hours. Als,o kiss proof. 10/10 would recommend for any big event or party!

Tada! All done! I love love love how this came out (and I love the Sultry Palette - next to Modern Renaissance, it’s my favorite palette that she’s come out with. It’s pigmented and the metallics are buttery and preform BEAUTIFULLY! Definitely, recommend this one!)


SHOP THE POST:

Later this week, I’ll share a tutorial on how I curl my hair and put my Simple and Blush headband in it to finish this holiday look! Let me know if you have any questions about it or the products I used!
P.S. If you found this tutorial helpful, would you do me a huge favor and pin the image above to Pinterest? Sharing is Caring! Thanks!